Introducing DeepView: Visualize your neural network performance
Optimize PyTorch neural networks, peak performance, and cost efficiency for your deep learning projects

As a machine learning (ML) researcher or developer, you’ve probably faced many challenges when it comes to optimizing the performance of your deep learning models. While traditional profilers can help diagnose performance issues in software systems, they often fall short when applied to ML workflows. That’s because these profilers are designed for systems people, providing detailed insight into low-level system metrics that may not be directly relevant to ML practitioners.
Inspired by these challenges, we’re excited to introduce DeepView!
In this post, we’ll show you how run your first ResNet-50 profile with DeepView and how to use DeepView.Predict to scale to other GPUs.
What is DeepView?
DeepView is a profiler. It helps ML developers who want to make their model run fast. It does this by providing a convenient visualization that shows where performance problems are. It also helps users with deployment.
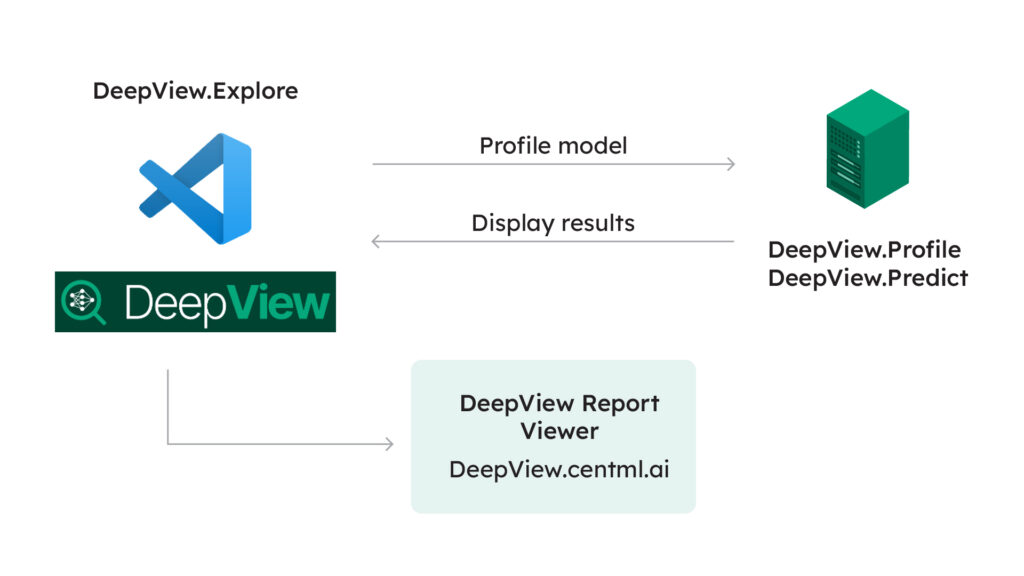
DeepView architecture
How to run your first ResNet-50 profile with DeepView
Step 1. Install DeepView.Profile
DeepView.Profile serves as the backend component of DeepView and runs on the machine that will be used to profile your ML model (training workload). It can be installed as a Python package from PyPI.
To start, create a Python virtual environment and execute the following command:
pip install deepview-profile
Next, start up the backend:
$ python -m deepview-profile interactive
2024-02-21 11:23 INFO     DeepView interactive profiling session started! Listening on port 60120.
Step 2. Install DeepView.Explore
Install the front-end component DeepView.Explore from the Visual Studio Code extension marketplace. To do this, go to the extension tab in VSCode, search for deepview-explore, and click “Install”:

Step 3. Download the ResNet50 example project
Clone the GitHub repository for DeepView.Profile and go to the examples/resnet50 directory. Here, you’ll find an implementation of ResNet50 and a sample entry_point.py file that describes the model, input data, and training iteration (you’ll need these entries to profile your ML model).
git clone https://github.com/CentML/DeepView.Profile.git
cd Deepview.Profile/examples/resnet
# if you have vscode installed, you can use code . to open the folder
code .
Step 4. Begin profiling
To analyze the model on your local machine:
- Navigate to the
resnetfolder in DeepView.Profile. - Press Ctrl + Shift + P to open the command palette or go to View → Command Palette.
- Search for DeepView and press enter.
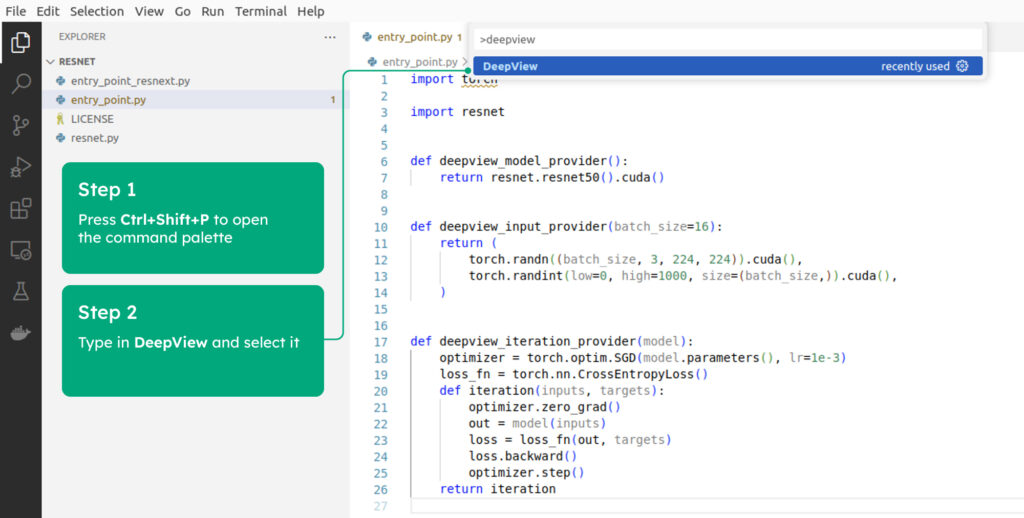
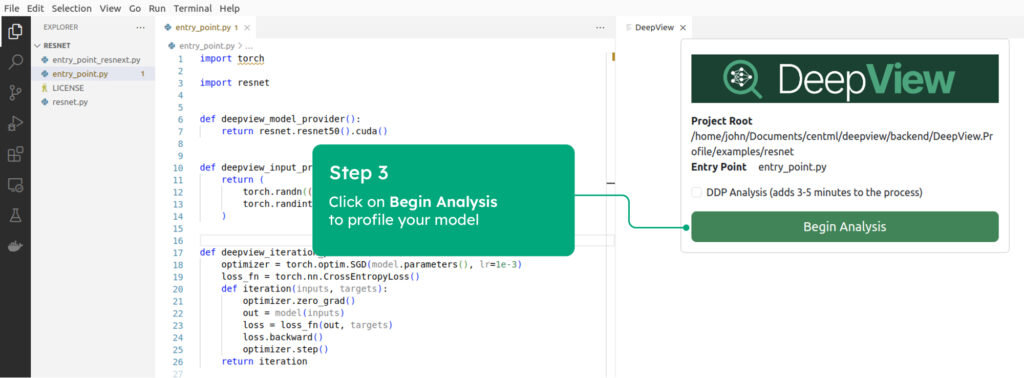
DeepView will search for the entry_point.py file in the directory.
Next, open the folder and click “Begin Analysis”:
How to use DeepView.Predict to scale to other GPUs
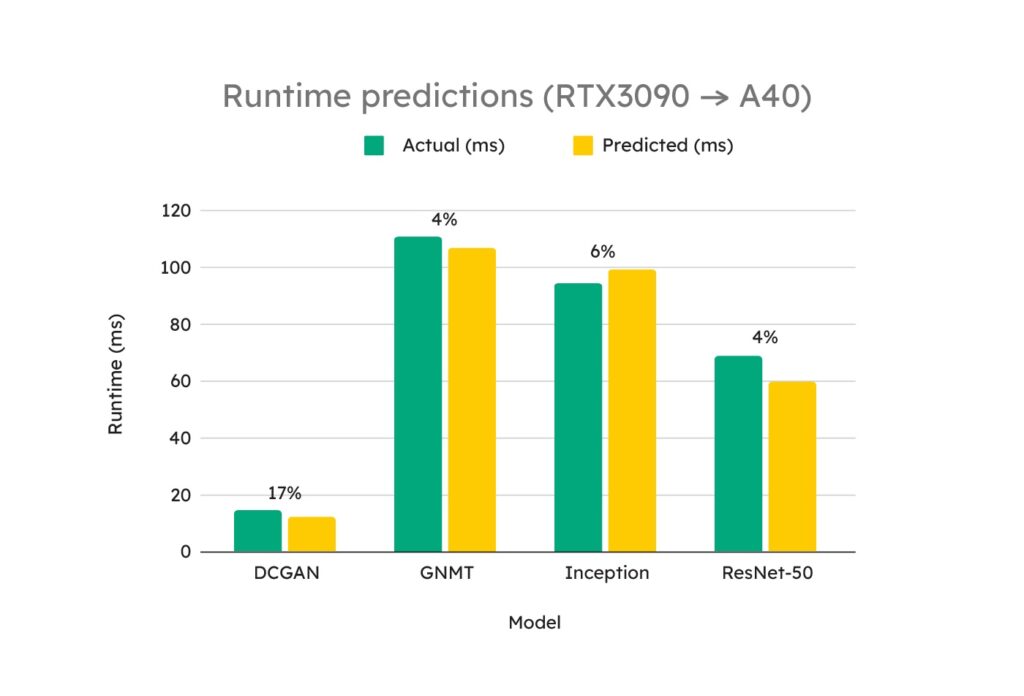
DeepView.Predict is a feature in DeepView that uses advanced algorithms and hardware-specific data to accurately predict runtime performance on different hardware architectures. It helps users select the most appropriate GPUs for development, cloud instances for deployment, or GPU clusters for large-scale training. By providing insight into expected performance, DeepView.Predict simplifies optimization, maximizes performance, and reduces costs, accelerating the development and deployment of deep learning models.
DeepView.Predict uses wave scaling and ML models to improve GPU selection decisions for deep neural network (DNN) training:
- Wave scaling adjusts the execution time of kernels for the same operations on different devices by taking into account proportional differences in hardware specifications.
- ML models are used for operations with different kernels, adapting to specific hardware implementations such as matrix multiplication and 2D convolution.
This combination approach enables DeepView.Predict to accurately predict the performance of ML models running on different GPUs, allowing users to choose the most effective option for their specific DNN tasks.
What’s next?
We’d love it if you gave DeepView a try. Install it, try it on your own models, and let us know what you think on GitHub (for more info on DeepView, read our docs).
In the next blog posts, we’ll profile a language model from HuggingFace and talk about soon-to-be-released features like the DDP predictor. It can help you know in advance if your model will scale when you train it with multiple GPUs, just by profiling locally on your workstation.
Thanks for reading, and here’s to the future of accessible AI! 🚀
Share this

