How to profile a Hugging Face model with DeepView
Understand performance implications of any Hugging Face model to resolve bottlenecks and optimize execution

Hugging Face has become a leading platform for natural language processing (NLP) and machine learning (ML) enthusiasts. It provides a large repository of pre-trained models and tools for developing advanced applications.
But before you start using an ML model, you need to profile it. Our open-source tool, DeepView, can help you analyze the behavior and understand performance implications of any Hugging Face model to resolve bottlenecks and optimize execution.
In this post, we’ll show you how to profile RoBERTa, an advanced natural language processing (NLP) model that improves upon the original BERT by modifying key hyper-parameters and employing a more robust pre-training approach.
How to profile the RoBERTa Hugging face model
We’ll use RoBERTa because it’s a medium-sized model that’s easy to profile and visualize.
To get started, make sure you have deepview-profile running on your machine (or see this post for instructions on setting up DeepView). Also make sure that you have installed the transformers and accelerate Python packages.
NOTE: We’re running RoBERTa on Google Cloud on an n1-standard-8 instance with an NVIDIA T4 GPU. You can see the list of all supported GPUs here. You can still follow along if your GPU is not on the list, but DeepView will not be able to generate predictions for you.
DeepView relies on an entry point file to learn about your project. This file contains information about the model, shapes of training data, and what a training iteration looks like.
In a file called entry_point.py, we include three functions that describe the above features:
deepview_model_provider: returns the model as ann.Moduledeepview_input_provider: returns a batch of inputs as a tensor. For profiling purposes, these just need to have the right shapes.deepview_iteration_provider: returns a function containing a training iteration.
For your convenience, we’ve included our entry_point.py file for RoBERTa. If you want to test a model other than RoBERTa, you can replace the model_id variable with your HF model ID.
# entry_point.py

from transformers import (
    get_linear_schedule_with_warmup,
    AutoModelForCausalLM,
    Trainer,
)
import torch
import torch.optim as optim

# The name of the HuggingFace model
model_id = "roberta-base"

# Model Provider: Returns an instance of the model
def deepview_model_provider():
    return AutoModelForCausalLM.from_pretrained(model_id, is_decoder=True).cuda()

# Input Provider: Returns an example of input
def deepview_input_provider(batch_size=2):
    vocab_size = 30522
    src_seq_len = 512
    tgt_seq_len = 512

    device = torch.device("cuda")

    source = torch.randint(
        low=0,
        high=vocab_size,
        size=(batch_size, src_seq_len),
        dtype=torch.int64,
        device=device,
    )
    target = torch.randint(
        low=0,
        high=vocab_size,
        size=(batch_size, tgt_seq_len),
        dtype=torch.int64,
        device=device,
    )
    return (source, target)

# Iteration Provider: Returns a function that executes a single iteration
def deepview_iteration_provider(model):
    model.parameters()
    optimizer = optim.AdamW(
        params=model.parameters(),
        betas=(0.9, 0.999),
        eps=1e-6,
        weight_decay=0.01,
        lr=1e-4,
    )
    scheduler = get_linear_schedule_with_warmup(optimizer, 10000, 500000)
    trainer = Trainer(model=model, optimizers=(optimizer, scheduler))

    def iteration(source, label):
        trainer.training_step(model, {"input_ids": source, "labels": label})

    return iteration
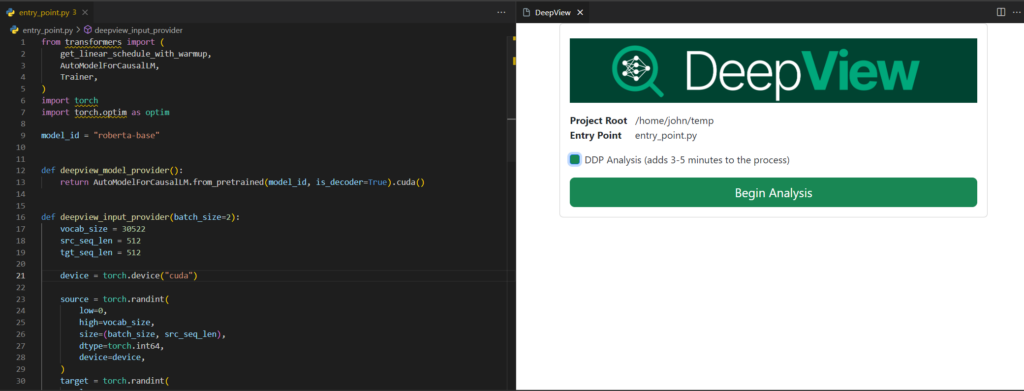
Now you can launch DeepView and point it to the folder containing the entry_point.py file.
In this demo case, we also want to see how the model would scale with multiple GPUs using distributed data-parallel, so we checked the “DDP Analysis” option. This allows for more profiling passes at the cost of longer profiling time.
On a T4 machine, training with a batch size of 2, we got a peak memory usage of about 3 GB and a throughput of 7 samples per second.
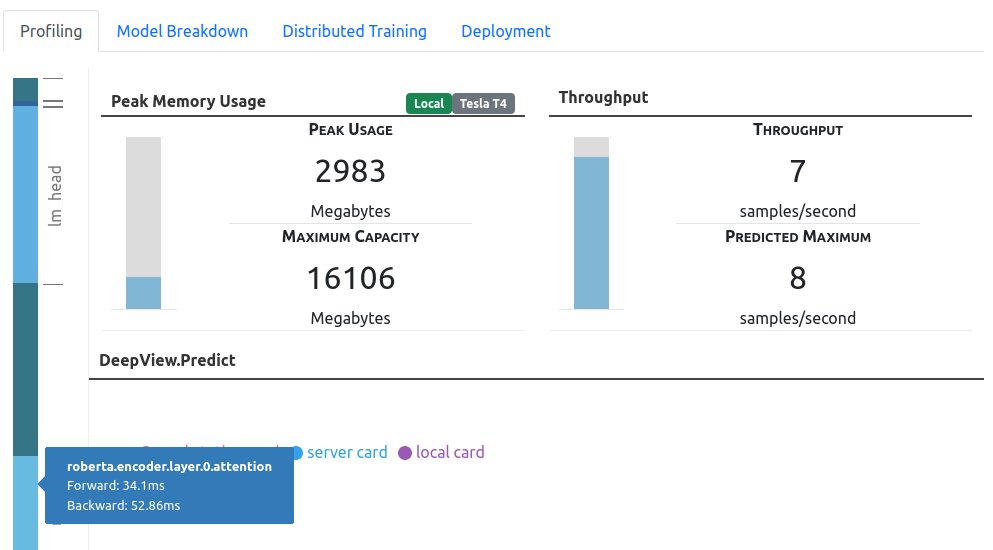
Should I train with a larger batch size? You can drag either the memory usage or the throughput bar to hypothetically experiment with different batch sizes. Typically, you’d expect to see higher throughput with a larger batch size, as the GPU’s computing capabilities would be saturated with more data. However, in this case, we see negligible gains from scaling with batch sizes because we’re compute bound when the batch size is 2.
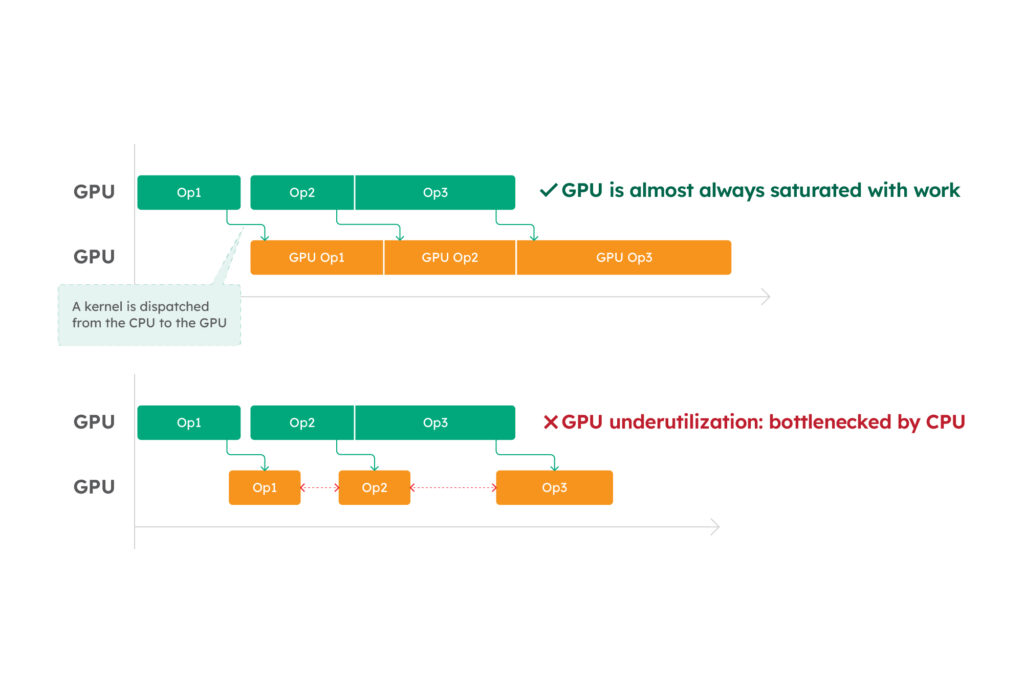
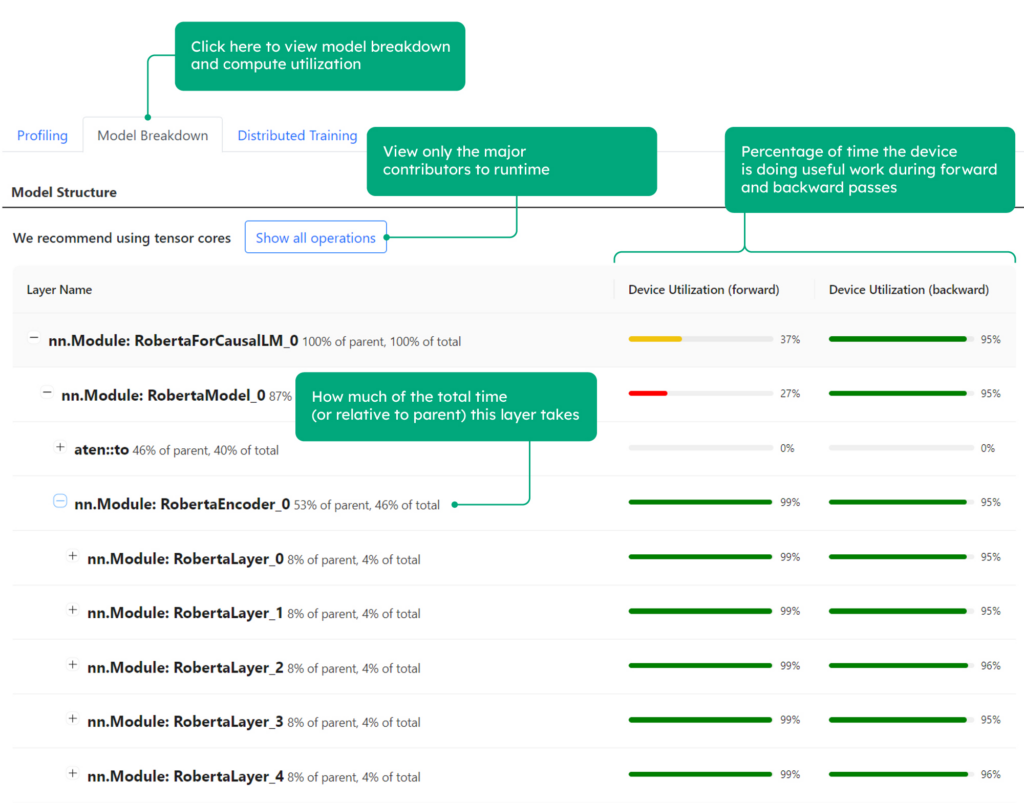
In the Model Breakdown section, you can get an estimate of the GPU utilization across different layers of the model.
NOTE: GPU utilization describes how much time the GPU is saturated with useful work. By looking at layers that underutilize the GPU, you can get a sense of where the performance bottlenecks are.
From the model breakdown view, you can see that the model has good GPU utilization, approaching 100% during the model execution. This shows that the performance of your GPU is being fully utilized.
Moving to the Deployment tab, you can see the cost effectiveness of different instances from different Cloud Service Providers (CSP) to train your model.
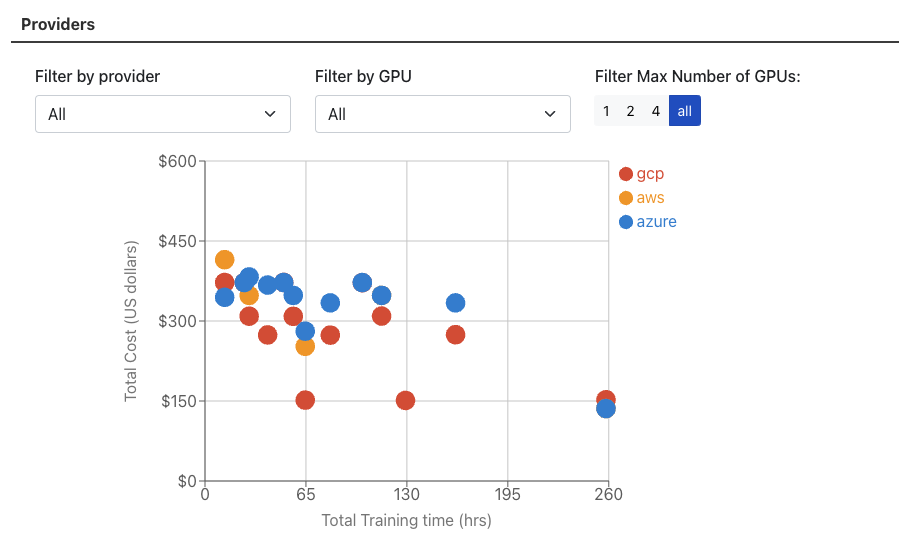
Which GPU should I use? Since compute is the bottleneck, it makes sense to use the latest GPU that offers both more compute power and more cost efficiency. This shows that scaling down GPUs is not always beneficial.
Now let’s see the performance in a multi-GPU data parallel execution setting.
In the “Distributed Training” tab, you can see the projected training throughputs for the different numbers of GPUs used in DDP training, measured in samples per second.
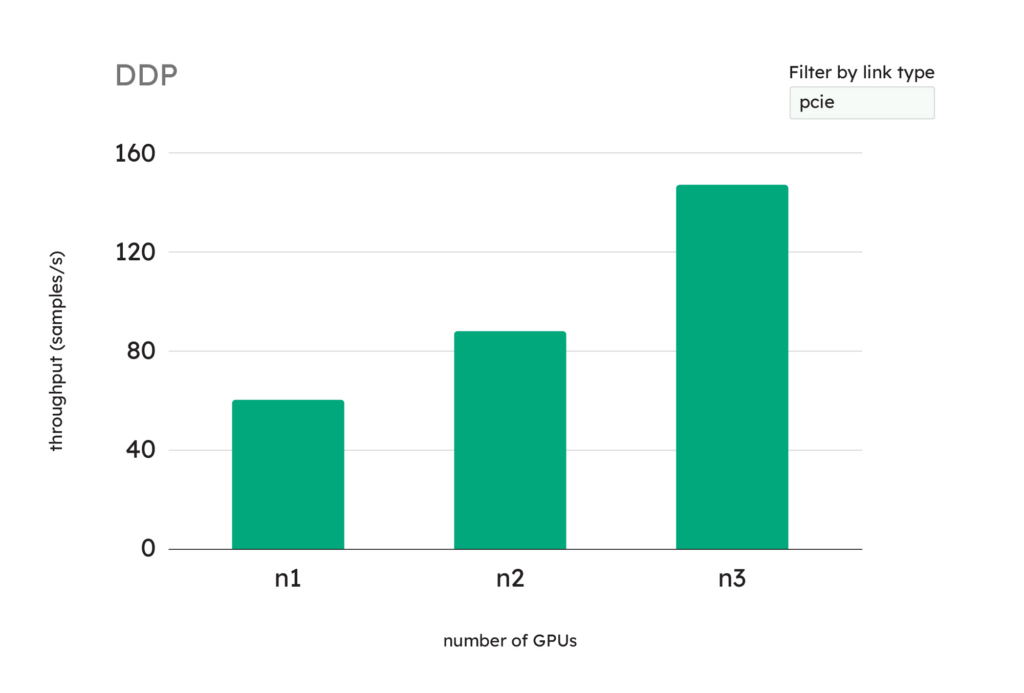
Should I use multiple GPUs? Yes, in this case, you can benefit from using multiple GPUs in a Distributed Data Parallel (DDP) environment because the training throughput increases as you add more GPUs.
How to profile other Hugging Face models
DeepView works with a wide range of deep neural networks, including other HuggingFace models. You can gain personalized insights for your particular use case by making some small changes to our example.
If you want to profile other Hugging Face models, you’ll need to make a few changes to the entry_point.py file:
model_id: Change the name of the model you want to profileAutoModelForCausalLM.from_pretrained: Change the arguments of this function depending on the modelvocab_size: Each model is trained with a different embedding layer—specify the vocab size of the model when generating the samples
What’s next?
Training large models is a major undertaking that requires a significant investment of time and money. We’re developing profiling tools for distributed training to give you insight into your model’s performance before you decide to execute your training workload.
If you use DeepView to profile Hugging Face models, please let us know what interesting details you find or how it has helped you. Your ideas and feedback help us move forward.
Here’s to a future of accessible AI! 🚀

Share this

